When I started volunteering for Edible South Shore magazine, I was so generously given their signature cookbook, Edible. The cookbook is amazing in that it tells the reader numerous farming and foodie stories from across the nation. There are few tidbits in the book about Allandale Farm in Brookline, and I happen to frequent there a lot, so it was pretty cool to see such an awesome write up about it.
The book's recipes are toward the end, and are divided amongst the four seasons. Edible magazines and books have a huge focus on supporting local farmers and eating in season, so the sections in the book were written accordingly. On a snowy night in New England (haven't they all been recently?), I decided it was time to look into the book once again. This time, I wanted something sweet, easy to bake, and I needed to have all items on hand. Luckily for me, I stumbled across the Harvest Cake with Cinnamon Cream Cheese frosting. The recipe was actually submitted from Edible Rhody (Rhode Island's version of Edible Magazine).
The cake's ingredients were pretty different from most that you would normally have, but me, being a big proponent of eating in season, actually had all of the veggies necessary to bake this cake. Harvest Cake is a winter dessert because it includes parsnips, carrots, squash. The veggies blend together well with the other sweet ingredients. The best part about this cake though is that it is totally justifiable! I mean, it has veggies in it after all!
Unfortunately, I did not have cream cheese on hand to make the proper frosting, but it turns out, the cake worked wonderfully with just a sprinkling of cinnamon and powdered sugar. If you have some leftover root veggies to use up, this is a great way to put them to work in a sweet way!
Harvest Cake with Cinnamon Cider Frosting
adapted from Edible Communities cookbook
2 Large carrots, grated
1 large parsnip, grated
1 medium zucchini, grated (I used frozen summer squash that I had)
1 tart apple, peeled, cored, and grated
1 3/4c APF
1/2c Whole Wheat Flour
1 1/2tsp baking soda
3/4tsp kosher salt
1 tsp cinnamon
1/2 tsp ground ginger
3 eggs
1c granulated sugar
1/4c packed brown sugar
1/2c grapeseed or other neutral oil
Cider Cinnamon Frosting
2 tbsp unsalted butter, softened
3/4c cream cheese
2 tsp apple cider
1c powdered sugar,
pinch of cinnamon
Preheat oven to 350. Grease a 9x9 baking pan, and line bottom with parchment paper. In a medium bowl, stir together carrots, parsnip, zucchini and apple. Set aside. In another medium bowl, whisk together APF, Whole Wheat Flour, baking soda, salt, cinnamon, and ginger. Set aside. In a large bowl (a lot of bowls here!), whisk together eggs and sugars until frothy. Add the oil and vanilla, and whisk until blended. Add the flour mixture into the wet mixture, and stir until just combined. Add the veggies/apples last, and stir until completely coated with the batter. Spread into prepared pan.
Bake until the cake is brown and quite firm with lightly touched in center, and a toothpick comes out clean- 45-55 minutes. Mine actually took 60 minutes. Cool on baking rake at least 1 hour before frosting.
To make frosting, if so desired, put cream cheese and butter in small bowl. Using a hand mixer or stand mixer with paddle attachment, whip the butter, cream cheese, and apple cider together until smooth, about 3 minutes. At low speed, slowly add powdered sugar, and cinnamon, and beat until blended. Taste and see if more sugar and cinnamon need to be added. Spread over cake when the frosting meets your taste standards.
1.27.2011
1.23.2011
Ricotta Cheese Gnocchi
This little guy,
Has thrown in quite a curve ball into our daily lives. Honestly, I love it, even though it means that I need to get up earlier, and leave work on time to let him outside. Gorgi is really a handsome little fellow, is a ball of energy, and as a result, he needs to go outside for long runs- this is encouragement for me to get outside and exercise, but it certainly adds to the already short evenings. As a result, dinners have had to change into quicker prep meals that are still tasty and nutritious.
I stumbled upon Ricotta Cheese Gnocchi in my beloved Mark Bittman cookbook. The process was much shorter than typical gnocchi recipes because potatoes are not involved whatsoever. This drastically reduces the time needed to prep, and adds a tasty element to the standard gnocchi dumpling. I was skeptical at first because I had never even heard of a Ricotta Cheese Gnocchi, but I must say, I am glad I tried it out.
To make the dough, you essentially mix together ricotta cheese eggs, flour, and S&P. The dough comes together in about 3 minutes, and does not even have to be rolled out into a rope and cut! The method for making the actual dumplings is to take spoonfuls and drop into boiling water. Meanwhile, you brown some butter in a pan, throw in a few sage leaves, and cook until gnocchi is done. At this point, you put the gnocchi into the brown butter sauce, toss and serve. Homemade Gnocchi with brown buttered sage sauce was on the table in 30 minutes. Amazing and divine! This recipe is definitely a repeater, and one that is sure to impress.
Homemade Ricotta Gnocchi with Browned Butter Sauce
adapted from "How to Cook Everything"
Salt
One 15-ounce container ricotta cheese, preferably whole milk
2 eggs, lightly beaten
1 1/4 cups freshly grated Parmesan, plus more for serving
Freshly ground black pepper
3/4 to 1 cup flour- I used about 1.25 cups
3 tablespoons unsalted butter
10 or more sage leaves.
1. Bring a large pot of water to a boil and salt it. Combine the ricotta, eggs and Parmesan in a large bowl, along with some salt and pepper. Add about 1/2 cup flour and stir; add more flour until the mixture forms a very sticky dough. Scoop up a spoonful of dough and boil it to make sure it will hold its shape; if it does not, stir in a bit more flour.
2. Put the butter in a large skillet over medium heat. When it melts and turns a nutty brown color, add the sage. While it fries, drop the ricotta mixture by the rounded tablespoon into the boiling water, working in batches of six or so at a time so as not to overload the pot.
3. When the gnocchi rise to the surface, remove with a slotted spoon and transfer to the skillet. When all the gnocchi are done, toss, taste and adjust the seasoning, and serve immediately.
1.19.2011
Celeriac with Rosemary Butter
Last weekend I was finally able to make it to the Pawtucket Farmer's Market. If you live in New England, you should definitely take some time and visit the market- it is outstanding, and has loads of friendly, knowledgeable vendors who bring only the freshest foods to share. The market is held in an old factory building, and is quite overwhelming as there is so much to look at and take in! I love shopping there and coming home with a lot of "treasures."
This particular visit, brought us many winter veggies. It is suprising to me to see how much can actually grow in this snowy and cold corner of the world. Fortunately though, we were able to score carrots, parsnips, pea greens, pink potatoes, celeriac, garlic, onions, cabbage, chicken, and a descaling knife (Finally!). Personally, I was most excited about the celeriac. I love the celery like taste and the starchiness of the veggie, and try to pick some up whenever I see them as they work great in any recipe.
I wasn't sure what to make with the celeriac this time around. I already had a soup picked out to make for lunches for the week, so the celeriac needed to be a side to some sort of dinner during the week. My go to man, Mark Bittman, came to my rescue yet again. His recipe for Celeriac with Rosemary butter was simple, easy, and delicious. I would even argue, that it was tastier the second day!
The rosemary really helps to enhance the flavor of the showcase veggie, and the added breadcrumbs, which were not in the original recipe, added a heartiness to the dish. I will most definitely be making this recipe again!
Celeriac with Rosemary Butter
adapted from "How to Cook Everything"
Ingredients
4 tablespoons unsalted butter
2 sprigs fresh rosemary
2 garlic cloves, peeled
2 lbs celeriac, trimmed, peeled and cubed
salt & freshly ground black pepper
1/4 c panko style breadcrumbs
Melt the butter in a large skillet over medium heat. Add the rosemary and garlic and cook gently until fragrant, about 2 minutes. Add the celeriac. Cook, turning every several minutes until soft and golden brown on all sides, about 30 minutes. Sprinkle with salt, pepper and breadcrumbs
Also, if you live closer to Somerville, check out the new Somerville Winter Farmer's Market. I hear that it is really great too!
1.16.2011
French Onion Soup
This post comes to you a little later than I had wanted. Forgive me as a blizzard, a brand new dog, and a sick boyfriend got in the way. Finally though, I am able to sit down and tell you about this amazing French Onion Soup I threw together for a wonderful Friday evening meal.
French Onion soup and I have always had a love hate relationship. I love the idea, and the taste of the soup, but am not always so fond of the onions in the soup. Apparently making your own changes the love hate into total love! The secret to this recipe is allowing the onions to brown and caramelize much longer than the original recipe dictates. I had read this in the reviews, and decided to follow the reviewers' advice.
French Onion soup is certainly easier than I had thought it would be to make, albeit time consuming. I would recommend picking a chilly evening night to make this soup, as it is both delicious and heart (and belly!) warming. While Jack and I were eating this, we somehow managed to sit at the dinner table for two hours! Can you imagine? I was shocked too, because quite frankly, our meals are typically 20 minutes long in front of the TV with the latest Middle episode on. Have you watched that yet by the way? That show is awesome!
I digress. Anyway, try out this fantastic French Onion Soup. You will wish you had years ago!
French Onion Soup
adapted from here
Note: I halved this recipe, and it was enough for two large soup bowls
For the broth:
6 ounces butter
8 large onions (or 12 small onions), thinly sliced
2 ounces port wine
2 ounces balsamic vinegar
2 quarts low-sodium chicken or beef broth
4 ounces slab bacon, cut into 1/2-inch cubes
1 bouquet garni- I sprinkled a little dried thyme in the soup
For the croutons and cheese:
16 baguette croutons (sliced and toasted in the oven with a little olive oil)
12 ounces grated Gruyère cheese- I used Emmentaler cheese, but in the future would just use Swiss
INSTRUCTIONS
For the broth:
In a large pot, heat the butter over medium heat until it is melted and begins to brown. Add the onions and cook over medium heat, stirring occasionally, until they are soft and browned at least an hour.
Increase the heat to medium high and stir in the port wine and the vinegar, scraping all that brown goodness from the bottom of the pot into the liquid. Add the chicken stock. Add the bacon and the bouquet garni, and bring to a boil.
Reduce to a simmer, season with salt and pepper, and cook for 45 minutes to an hour, skimming any foam off the top with a ladle. Remove the bouquet garni and the bacon.
When the soup is finished cooking, ladle it into the individual crocks. Float croutons on top of each. Spread a generous, even heaping amount of cheese over the top of the soup. You want some extra to hang over the edges as the crispy, near-burnt stuff that sticks to the outer sides of the crocks is often the best part.
Place each crock under a preheated broiler until the cheese melts, bubbles, browns, and even scorches slightly in isolated spots. The finished cheese should be brown hues.
1.09.2011
Luscious Lemon Spritz Cookies
Phew! This week has been rather hectic and eventful! After returning to MA, Jack and I took it pretty easy, as both our jobs were about to get hectic. And hectic did happen. We needed to squeeze in workouts (New Year's resolutions in action!), long work hours, planning for potlucks, and food shopping. Friday could not come soon enough, especially because I was excited to make French Onion soup for the first time. It is one of Jack's favorites, and I find it quite tasty too, but more about that another time.
This weekend we also managed to squeeze in a little SPCA visit, where we got this little guy!
Meet Gorgonzola, Gorgi for short!
After January 2nd, we decided to try to get back to eating more nutritious foods. We had gotten out of the swing of things after Thanksgiving, and figured now was the time to start, with the ending of the holiday season. To accompany the return to our more normal eating habits, I decided to try to bake less often, and if the desire did come to make something, try to bake a dessert that was a little less indulgent. Hence, the Lemon Spritz Cookie.
While at first glance, a lemon spritz cookie does not look to be the most healthy cookie on the planet, in all reality, it is for us, because the bitterness of the lemon enforces us to only eat one! See, that is one of the problems both Jack and I had- eating numerous cookies in one sitting. Discovering a delicious, easy to make cookie that allows us to only eat one, is brilliant and wonderful!
Lemon spritz cookies are a cinch. Whip up some dough, zest some lemon (or other citrus fruit), refrigerate for a little, and cut the cookies onto the pan and bake! Once baking is complete, toss in a bag with powdered sugar, and you've got yourself a little citrusy treat! I very highly recommend these cookies for the mere fact that they are simple and delicious!
Lemon Spritz Cookies
adapted from Martha Stewart
makes 20-24 cookies
6 tbsp unsalted butter, room temperature
1/2 cup confectioner's sugar (rough estimate)
Grated zest of 1 lemons
1 Tbsp lemon juice
1/2 Tbsp vanilla extract
7/8c plus 1 tbsp APF
1 Tbsp Cornstarch
1/8 tsp salt
Put butter and a scant 1/4 cup of confectioner's sugar in electric mixer bowl fitted with paddle attachment. Mix ingredients on medium speed until pale and fluffy. Add zest, juice, and the vanilla and mix until fluffy.
Whisk together flour, cornstarch, and salt in another bowl. Add to the butter mixture, and mix on low speed until just combined.
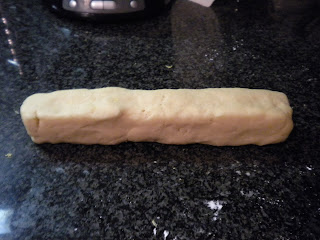
Shape dough into a log, and roll into saran wrap. Refrigerate log until firm (or put in freezer for quick chilling). Refrigeration takes about an hour, Freezing takes about 25 minutes.
Preheat oven to 350F, Cut dough into 1/4 inch rounds. Bake cookies until barely golden, about 13 minutes (mine took 14). Transfer cookies to wire racks to cool for 10 minutes. While warm, toss the cookies with remaining powdered sugar to coat. Do this in a resealable plastic bag for no mess. Cookies can be stored in containers at room temp for 2 weeks.
1.02.2011
Sizzlin' Shrimp Scampi
After a brief hiatus in my own kitchen due to winter holidays and a still ongoing "Nasty" ear infection, I am finally back at it, and this time, with one of my favorite meals, shrimp scampi. I had never made it before for fear of not making an even comparable rendition to a few of beloved Italian restaurants, but after being away from my kitchen for so long, I wanted to return with a bang.
The scampi recipe itself is super easy, however, my recipe reading skills had been on a break so long that I read them incorrectly. Fortunately, I am finally experienced enough with cooking that I was able to salvage my mistake and create a terrific meal!
I found the recipe here, a website that I had never heard of before. Thankfully though, the guy knew what he was doing when he came up with the recipe. The shrimp scampi was awesome, so so awesome. I will be repeating this meal, for both the taste, and the simplicity. It is a great weeknight meal, and is fairly nutritious too.
Shrimp Scampi
Adapted heavily from here
1/4 lb Shrimp
2 Cloves Pressed Garlic
1/4 tsp Salt
A dash of Cayenne
1 Tbsp Olive Oil
2 Tbsp Butter
1 tsp Sherry
I Pinch Lemon Zest- I didn't have a lemon, so I used extra lemon juice
1 Tbsp Chopped parsley
1 tsp Lemon Juice
I added kale and some bread crumbs at the end for added nutrition and texture.
Defrost the shrimp if they're frozen and peel them. In a small bowl combine the shrimp, garlic, salt, cayenne, and olive oil. Set that aside for a few minutes to let the shrimp marinate. If the shrimp are still a little bit frozen be sure to let it sit until they are completely thawed.
Meanwhile, start a pot of water to boil, and cook the pasta.
Over medium heat, in a small pan, melt the butter over medium low heat.. As soon as the butter has melted, add the shrimp. Let them simmer on one side until they're done half way through and then turn them and cook till done. The time will vary depending on many factors, but for the size shrimp I was using here I turned them after about 4 minutes and then cooked them for another 2 minutes
Just before the shrimp are just done add the sherry, lemon zest, parsley, and lemon juice. Stir everything together and cook for a few seconds more.
Michelle's Notes- I did not read the recipe in its entirety and mixed all ingredients together right off the bat to marinate. Fortunately this still worked too, and probably added more flavor. Prior to putting all ingredients in the pan though, I did add extra olive oil and garlic to make sure that the shrimp would not stick to the pan.
Subscribe to:
Posts (Atom)