4.26.2010

Spring has Sprung!

Over the past few weeks there has been a noticeable change in the Massachusetts weather. The sun is finally out, t-shirts abound, and flowers are in full bloom! It’s finally spring!


In effort to fully appreciate my new suburban lifestyle, I, or rather, Jack and I, have started our very own garden. It has definitely monopolized our last few weeks, but I have found some time for some spring baking, which you will see below.


The garden started out as a minor project in our eyes, but what has developed is a small indoor farm (for right now!). This is all in addition to the CSA we joined.! We now have 3 different types of tomatoes, including the Mortgage Lifter which is a heirloom variety, growing, string beans, French beans, zucchini, pumpkins, celery, and are waiting to plant the onions, cucumbers, and carrots straight in the ground after the last frost. Our prized plant though-the peas! They shot right up out of the makeshift planters that we made out of egg cartons. They are about 4-5 inches tall after almost 10 days of being planted.


The planting of most seeds was finished about a week ago, but that was just the beginning. There were weeds to pull, compost to be bought, and fences to be put together. Needless to say we had our work cut out for us, but in the end, it will hopefully all be worth it. If anything, it is certainly self-satisfying, and keeps us busy, and the cat happy playing in the garden. This past Sunday was totally devoted to garden work, and I even spread some Chicken compost! The highlight of the day was not the garden though, rather, it was the fresh grown asparagus we were able to find at a local farm. The vegetable was so tender and fresh, and roasted beautiful with minimal effort. I highly recommend purchasing some soon! Ours was picked fresh that morning.


To celebrate both the ending of the root vegetable season and the beginning of spring, we dined on roasted asparagus, roasted pureed parsnips, and free range chicken for dinner that night. It was followed by a dessert of lime yogurt cake taken from Smitten Kitchen, but with a vanilla glaze instead of a berry glaze. Delicious!


Prior to the garden work though, and even this past weekend, I was able to visit a friend in my old city to help celebrate her upcoming marriage. I had the fabulous chance of staying with one of my friends and so, I decided to make some spring cookies and wrap them up very pretty. Needless to say, I am sure they crumbled a little bit on the 6-hour car ride… O well!


In any case, happy spring! Enjoy this lovely season and all of the fresh fruits and veggies that accompany it!

4.20.2010

How to Get a Le Creuset Dutch Oven...

Ever since I started cooking, you know, 3 months ago, I dreamed of owning a beautiful, lime green, cast iron Dutch oven.  See, I knew it would always be a dream instead of reality because I had 3 things in the way of owning one-the price tag, the fact that I owned one from Caphelon already, and a stingy boyfriend named Jack (Shhh. Don’t tell him I said that!).

Then one day after using the original Dutch oven, it broke while cooking on the stovetop. Pan=1, Jack=0. We agreed that we would try again with another identical red one from Caphelon. Then Easter happened, and my father tried to make the Julia Child Ham Glaze. The second one, yeah it broke in the same way the first one did. In 2 months we had broken equally as many Dutch Ovens. Pan=2, Jack=0.


So, we decided to invest in another one, but wanted a lower costing Cast Iron Dutch oven. After throwing around a few ideas, we were going to look at one at Kohl’s because I had a gift card, and they always have sales. Fortunately, a friend of mine from Slow Food (Thanks  Sharon!), mentioned a wine tasting that happened to be going on at a Le Creuset outlet near us.


My master plan all came together: Woo Jack after a week of being out of town with a wine tasting that just so happened to be located at a store that housed my dream Dutch oven. So, next step: Get Jack intoxicated, and get me a Dutch oven. We arrived at the wine tasting around 6:30, and started eating some cheese and drinking some wine. Sales people approached us several times and started explaining all of the benefits of owning one. Finally, he caved in, and we are now proud owners of a Lime Green 5 qt Le Creuset Cast Iron Oven. Boy, how my desires changed since moving to the suburbs…


Directions:

  1. Break 2 Dutch ovens
  2. Woo significant other with girlish charms (and free wine!)
  3. Have encounters with knowledgeable salespeople
  4. Make sure significant other drinks a good amount of wine
  5. Kindly ask for one
  6. Purchase!

4.18.2010

Bake Week=Cupcake Week

Last week (well probably 2 weeks ago) was bake week, and as soon as I found out, I decided to finally crack open my new Magnolia Bakery cookbook. There were so many different recipes that I wanted to try out, but decided to have Jack pick out his recipe of choice since he would be going out of town and could maybe take them with him. After much deliberation, he chose Apple Cinnamon Walnut Cupcakes. Upon initial review of the recipe, it looked slightly time consuming, but most importantly, looked challenging as I had to make my very own caramel from scratch for the Caramel cream cheese frosting. 


The recipe was quite different because it started with a whole lot of oil instead of a whole lot of butter. Once everything was prepped and ready (walnuts chopped, apples diced, etc.), I started getting the cake batter ready- and it was a breeze. Everything went as planned. I filled the cupcake holders and baked the cupcakes. Then the timer went off after 20 minutes. The cupcakes weren't ready. I put them in for another 5 minutes. Still not done. I then tried another 10 minutes. Finally complete. Oddly enough though, the cupcakes looked more like muffins, which came in handy later.


Next up, Caramel Cream Cheese Frosting. There were only 3 ingredients involved. Sugar, Water, and Cream Cheese, how hard could it be? I needed to boil the sugar and water until the mixture turned dark amber, roughly 15 minutes. I did exactly as told, and then mixed with the cream cheese after cooling the boiling liquid. After the frosting was finished, Jack tasted it prior to putting on cupcakes. Thank goodness he did! It was awful! It tasted like burnt cream cheese mixed with a very bitter tasting caramel. Yuck!


Fortunately the cupcakes looked and tasted more like muffins- so the Apple Cinnamon Walnut Cupcakes became the Apple Cinnamon Walnut Muffins all in celebration of bake week!

4.11.2010

Let's Play: Identify the Vegetable


The last time that Jack and I took a trip to visit our faraway Whole Foods, we decided to find a mysterious vegetable to try. The criteria was that it had to be weird, something that we had never seen before, but had to be liked by both of us. That meant that carrots were out as I don’t like them in mass quantities. So Jack picked this odd-looking light lime green circular vegetable. The description said it was to taste like a squash, which we both do like. 


After a few days and still no idea of what it actually was (as neither of us remembered…), I decided to take a stab at it and cook it the only way I knew how-stuff it with cheese and mushrooms and garlic-only the best ingredients in the world!

So I have no recipe to follow other than this. Acquire these strange looking greenish squash like vegetables from your local, or in our case, not so local Whole Foods. Cut in half, carve out middle, and stuff with whatever your heart desires. I used a combination of mushrooms, chevre, minced garlic, and freshly grated Parmesan cheese.


Upon tasting the vegetable, I found it to be exactly as Whole Foods described- like a squash. The texture was more of that of a radish or raw potato-juicy but crunchy. I would definitely buy this again, though Jack did not like it so much.

The overall outcome of my own special recipe creation was great in my opinion as it was made to fit my mood exactly. When finishing for leftovers the next day, my opinion was slightly different-not made for the microwave! Either way, I loved the dish, and have come to the conclusion that cheese, garlic, and mushrooms make anything better.

After reading this post, and the viewing the vegetable pictures, can somebody please tell me what we ate? :)

4.07.2010

Hostess with the Mostest

Easter weekend afforded me the chance to finally see my family again as they decided to make the trek up to Mass from Pennsylvania. I was super excited to see them as I hadn’t since Christmas, and I was stoked to plan and make my first Easter dinner for the everyone, along with brunch and a Friday night dinner.

Jumping back a year ago in my mom’s kitchen, you would have found me begrudgingly setting the table instead of helping to chop, bake, and boil vegetables and potatoes. Quite frankly, I didn’t even know how to really even cut a vegetable, and I was proud to say that! I believed that by giving into the desire to cook, I would miraculously turn into the generations of women before me- the designated housewife who cooked, cleaned, and looked after the kids, instead of an independent, successful woman. Needless to say, I have changed quite a bit in the past year.

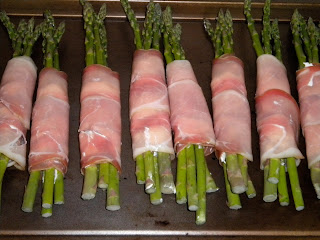
Jack and I wanted to plan an Easter menu that offered some traditional food options, but also new takes on old recipes. We decided to expose my family to a small variety of dishes they might enjoy, but we knew we were taking a small risk because not everyone has the same taste that we do. We decided to continue our pretty steady Sunday tradition of making a recipe from Julia Child’s famed cookbook: Mastering the Art of French Cooking I-Jambon Braise Morvandelle (The recipe is also found on page 392 in her famed book), and then add some recipes that Jack found online. We decided upon: Prosciutto wrapped Asparagus, Baked Brie, Cauliflower Soup, and Artichoke Mashed Potatoes. For brunch on Saturday we offered Lemon Poppyseed Pancakes with bacon and eggs, and on Friday night we served homemade gnocchi and a terrific arrabiata sauce made by Jack who added heavy cream to the original recipe which made it delectable. Needless to say the weekend was completely dominated by site seeing and cooking, and more so on the cooking side. By the time my family left, I headed straight to bed to recover.


Easter lunch was the highlight of the weekend though as far as cooking is concerned. The meal brought the whole family together to cook, well maybe not Ash and Brandon, but my mom and dad very graciously offered to help. My dad actually took the reins and made the Julia Child Ham, and my mom helped to slice and dice veggies, and assemble the baked brie. We ended with only one broken dutch oven which was a success as far as I’m concerned working in a galley kitchen.


The dinner was delicious and I cannot wait to host one again. In the meantime, enjoy some of the “Lovely” pictures of my family (we are not so photogenic we Talisesky’s), but we try hard!


My sister, brother, and I in Newport RI in front of The Breakers mansion.

Same location, but with entire family.

4.05.2010

Eggcellent Peanut Butter Fun!


Every year at Easter time, my Nana makes her beloved peanut butter eggs. Note to everyone reading, think Reese’s eggs, not real eggs! These delicious chocolate candies give my family and friends such pleasure they ask for them every year. This year, having been the first that I was unable to go home for Easter, I had to make them myself. Nana was pleased when I called to beg her for her recipe-thankful that someone would be continuing her peanut buttery legacy amongst other delicious recipes. When I heard the ingredients, I thought, self, never ever reveal because they contain everything bad for you. Then I thought, well a. It’s Easter, and b. who doesn’t eat delicious, bad for you candy at Easter time? I mean, isn’t the point of the Easter bunny to deliver delectable morsels (or giant) sized, candy crème filled chocolate covered goodness? That’s why I always loved the Easter bunny, and had 4 cavities as a child J.


To make the eggs, first put on a brave face and know that one egg really won’t kill you. I have had at least 8 in the past week, and here I am blogging. First, combine all ingredients except for the powdered sugar. Then slowly add powdered sugar, amounting to 1.5 pounds, unless more is needed.


Shape the dough into eggs, and then refrigerate on parchment covered cookie sheets until firm. After the eggs have been cooled and set, start melting the chocolate using a double boiler-or my method of 2 pans that happen to fit on top of one another.  Put in semi sweet chocolate, and a little bit of paraffin wax to make the chocolate smooth. Dip the eggs into the chocolate goodness using a toothpick or fork. Allow the chocolate to harden and cover holes in top from toothpick using a brush. Put eggs back into refrigerator to harden. Store for up to 3 weeks.


Enjoy the yummy goodness, and be sure to lick your fingers or paws like Oscar!


Ingredients:

3 sticks of butter, softened

1.5 lbs powdered sugar

8 oz marshmallow fluff

8 oz peanut butter

Semi Sweet Chocolate and Paraffin Wax for coating

Directions:

Combine the butter, fluff, and peanut butter. Slowly add in powdered sugar until the dough becomes cookie dough like. Shape the dough into egg like shapes and refrigerate on parchment paper covered cookie sheets until chilled. After the eggs are chilled, start a double boiler and put semi sweet chocolate (roughly 8-12oz) and a little bit of paraffin wax in top pan. Allow to melt and then dip eggs into chocolate. Chill eggs after coating in refrigerator, where they can be stored up to 3 weeks.